Friday, July 29, 2011

Installing Testlink on Windows Servers

Greetings everyone,


Like many I have the need to implement a test case management suite. Being knee deep in MSDN licensing there isn't a need to stand up a new linux box or install apache on a windows server that already has IIS installed.... So for those of you wrapped in windows here's a walkthrough for standing up Testlink on your windows box.
  1. Download latest testlink from http://sourceforge.net/projects/testlink/files/TestLink%201.9/TestLink%201.9.3/testlink-1.9.3.tar.gz/download
  2. (2003 or 08 servers) Using the web platform installer install the latest version of php from http://blogs.iis.net/bills/archive/2006/09/19/How-to-install-PHP-on-IIS7-_2800_RC1_2900_.aspx
  3. Windows 7 - Download the latest version of php from http://www.windows.php.net/downloads.php 
  4. Extract php to c:\php5
  5. Add to your path the location of your libmysql.dll
  6. Update your php.ini file
    • Enable mysqli extension
    • Set the extensions dir 
      • extension_dir = "ext" 
    • set the max execution time
      • max_execution_time = 120
    • set the default socket timeout
      • default_socket_timeout = 86400
  7. Configure IIS
    •  Start --> Control Panel -->Programs -->Turn Windows Features on or off and check on the Internet Information Services entry.
      •  Activate the World Wide Web Services/Application Development Features/CGI node and also Web Management Tools/IIS Management Console
    •  Restart iis - iisreset from a command prompt
    •  Start the IIS Management Console
      • Double click the Handler Mappings
      • Click Add Module Mapping on the right column
      •  In the Add Module Mapping dialog
        •  Request Path = *.php
        •  Module = FastCgiModule
        •  Executable = c:\php5\php-cgi.exe
        • Name = PHP
        • Click yes to create a FastCGIApplication
  8. Install MySQL
    • Be sure to  run the MySQLInstanceConfig.exe to configure server settings
  9. Run the Testlink installer http://localhost/testlink
    • Once you have configured and secured Testlink and MySQL your ready to go!
Thursday, July 7, 2011

Syncing your Itunes library with your android phone.

So you want to sync you itunes library with your android device? 

First, download itunes agent
After install the application runs in the system tray.
Plug in your android phone using your USB cable. (note: if your android phone prompts you for a connection type select to use as a Disk Drive) 
Open the drive from your computer and create a folder called Music.
Click the iTunes Agent icon in the system tray and select preferences. 
Leave all Agent check boxes checked
Provide a name. e.g HTC Incredible 2
Select iTunes as the Synchronize pattern
Click Choose to select your Music Folder (this is the Music folder you created on your phone. When selected it will be displayed as "Music" in the Music folder field)
In the Recognize by folder/file field select the Music folder again on your phone. This will create a .ita file that directs iTunes Agent to the folder to sync with.
I Use device name to Associate with playlist as it helps keep iTunes clean. 
Click Save

Next launch iTunes and you will see Devices in your playlists. Copy the music you wish to have on your phone to the playlist. 
Open the iTunes Agent and Synchronize Devices

Next step is on to your phone.
I prefer Cubed for Android (also known as 3) but your mp3 player is entirely up to you!

Enjoy!

Friday, June 17, 2011

Using Client Certificate with SoapUI

After hunting around on this process a bit myself I've ironed out the details so you don't have to. 

Important notes for importing your certificate:
Double click the client certificate
Click Next on the Import Wizard
Click Next on the file import screen
Type your private key password
Check the "Mark this key as exportable. This will allow you to back up or transport your keys at a later time." checkbox.
Click Next
Click Include all extended properties
Click Next
Click Next to Automatically select the certificate store
Click Finish
Click OK on the Import confirmation dialog

Next export your client certificate so it can be used by SoapUI

Export your client Certificate
Click Start
Type MMC and press enter
Click File and select add/remove snap-in
Select certificates from the Available snap-ins column
Click Add
Select My User Account
Click Finish
Click OK on the Add or Remove Snap-ins window
Expand Certificates - Current User
Expand Personal
Click Certificates
Select the desired certificate
Right Click the certificate and select All Tasks
Click Export
Click Next on the Welcome screen
Click Yes, Export the private key
Click Next
Click Personal Information Exchange - PKCS #12 
Check Include all certificates in the certifcation path if possible.
Check Delete the private key if the export is sucessful
Click Next
Enter the cert password
Enter the cert password (password confirmation)
Click next
Select a name and location for the cert to be saved
Click save
Click Next
Click Finish
Click ok on the Confirmation dialog

Next set your SoapUI Configuration file
Open "C:\Program Files\eviware\soapUI-3.6.1\bin\soapUI-3.6.1.vmoptions" in a text editor
Add the follow line the end of the file
'-Dsun.security.ssl.allowUnsafeRenegotiation=true'
Save the file

Open SoapUI
Expand the File Menu
Select Preferences
Click SSL Settings
Set the following settings:
keystore: path to your certificate
password:
self explanatory
Check the 'Require client authentication' box
Click OK

That's all that's to it! Create a new project with your webservice and test away!

Thursday, June 9, 2011

Mecury Quality Center 9 & Internet Explorer 8.0

Anyone spending any time frustrated with Quality Center understands the corporate hesitation in the exorbitant expense of Quality Center 10 and the lack of support for any browser beyond Internet Explorer 7 in Quality Center 9.  In attempt to put a rest to your futile efforts clicking search result after search result I have compiled my research into one location.
 
Internet Explorer 7.0 is the latest browser supported by Quality Center 9.0. Therefore it is necessary to utilize compatibility mode as well as modify security settings in Internet Explorer 8.0 for the application to function properly.

  1. Launch IE 8 
  2. Expand  the Tools menu 
  3. Click Compatibility View Settings 
  4. Uncheck Display intranet sites in Compatibility View if checked. 
  5. Enter <YOUR MERC SERVER> into the Add this website edit box 
  6. Click Add 
  7.  Click Close
    (
    You should now be prompted to Install Mercury Quality Center 9.0
    If so skip to step 17.)
  8. Expand the Tools menu again
  9. Click Internet Options
  10. Click Internet Options
  11. Click the Advanced Tab
  12. Locate the Security Section
  13. Click Reset to Reset IE’s settings to their default condition.
  14. Click OK
  15. Restart Internet Explorer
  16. Navigate to your Mercury Quality Center url. 
  17. Click Install to install Mercury Quality Center 9.0 
Option 2 (If persistent issues with IE8 or the above fails to install Quality Center):

  1. Download the Quality Center Explorer from ftp://ftp.itrc.hp.com/applications/qualitycenter/qc90/others/qcexplorer/QCExplorerAddIn.exe
  2. When prompted to save QCExplorerAddIn.exe click Run
  3. Accept the default installation directory
  4. Click Next
  5. Click Start
  6. Click All Programs
  7. Expand Quality Center
  8. Click QC Explorer
  9.  In the Address bar enter the address to our Mercury Quality Center instance 
  10. Click Go     
 After all necessary components are downloaded you will be prompted for your login credentials.

Enjoy! Keep on Nerdin'

Sunday, June 5, 2011

Proform XP 615 Trainer treadmill calibration

The Proform XP 615 Treadmill project started a couple months ago. With the wife back in school I had to come up with some way to continue a running routine whilst not being a neglectful parent. Being a firm believer in: There's someone, somewhere, that bought it, let it collect dust, and is willing to practically give it away. I began a brief search for that individual. I found her at a garage sale, seven months pregnant, and offering a the profrom 615 for 50 bucks. Inch of dust and 300 miles on it, we took her home (the treadmill, not the pregnant gal). 

After a few runs and re-calibration of my Nike+ sensor, I began the hunt for the calibration procedure for the treadmill. So you don't have to here it is:


Calibrating the Proform XP 615 Trainer Treadmill

Follow these steps to calibrate your Proform XP series treadmill.
WARNING: DO NOT STAND ON THE TREADMILL BELT
  1. Remove the Motor Cover by removing the three screws on the front of the unit. 
  2. Locate the MAX SPD potentiometer (pot) on the motor control board. This is the board the red and black motor wires connect to. The MAX SPD pot should be labeled. Mine wasn't however, there is only one potentiometer on the board. It is a small square box that has a phillips head on it.
  3. Press and Hold the STOP and SPEED UP button while inserting the safety key.
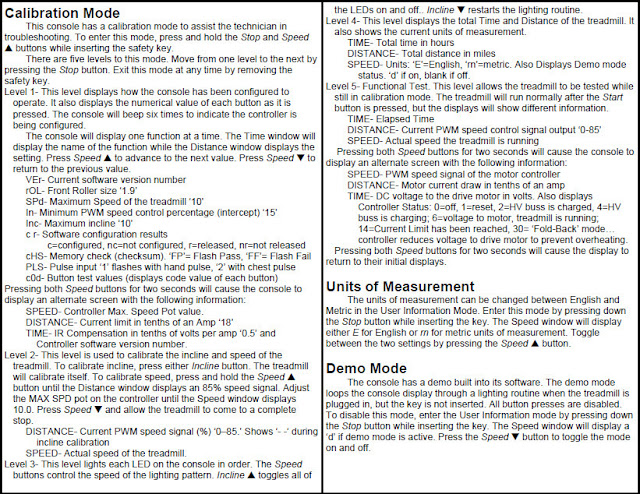
  4. Press SPEED UP button to display setting (See Calibration sheet below) Your concern here is the SPD - Maximum Speed setting (default may be 10)
  5. Press the STOP button to advance to Level 2 Calibration Mode
  6. Press the the INCLINE UP button to begin incline calibration (this calibration is automatic)
  7. Press and hold the SPEED UP button until the distance window displays 85%. (The actual speed will be displayed) 
  8. Press the SPEED DOWN button and allow the treadmill to stop
  9. Using a small insulated screwdriver adjust the potentiometer clockwise to speed up and counter-clockwise to slow down the max speed of the treadmill. A tiny turn of this potentiometer will make a huge difference in speed, so use care when making adjustments.
  10. Complete steps 3, 5 then 7 - 9 to adjust the speed as necessary.
    It is not important to get the speed set exactly at the max speed of the treadmill but do make sure to get the speed within .2 MPH of the max speed of the treadmill.
  11. Press SPEED DOWN to complete the calibration.
  12. Press the Stop key once and remove the safety key.
ProformXP615 Manual


Calibration Mode

Talking Nerd

Ok so after a long sabbatical from blogging, tweeting, and posting random useless junk on a website. I have finally decided to begin to document what the wife refers to as 'talking nerd'. Typically derived from a project, that led to a web search, that led to another, that led to a link, a document and a process to complete some task that someone failed to simply put in one place. That's the beauty of the internet. Everything you need scattered over thousands of sites and if your good a puzzles you can get it together.

Welcome to the birth of 'Talking Nerd with Woody'.